...
Download the attachment for this article that provides the Playbook from the listing above.
On the PartnerStage environment, select Playbooks from the menu at the top.
On the Playbooks screen, select New > Import Playbook:
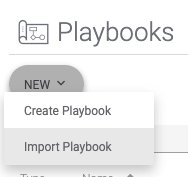
On the Open dialog that appears, select the file you downloaded above (*.pbx file). The Playbook will be loaded into your environment and you will be shown the Designer screen.
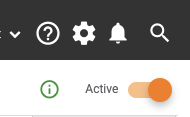
On the Designer screen, toggle the Active switch at the top-right so that it shows the button to the right and has the info icon to the left:
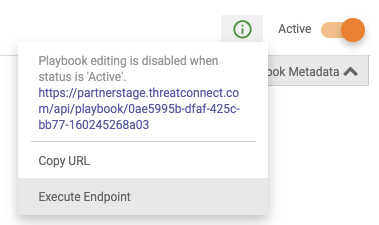
Select the info icon and choose Execute Endpoint:
A new tab should open and you should be presented with a JSON document that contains all of your custom attributes. Output similar to the below should appear:
Code Block { "types": [ { "allowMarkdown": false, "description": "Farsight DNSDB End Date", "errorMessage": "Invalid Date Format, Please Enter Farsight DNSDB End Date in YYYY-MM-DD format", "maxLength": 10, "name": "Farsight DNSDB End Date", "system": false, "version": 1, "indicators": [], "groups": [], "validationRule": { "name": "FarsightDateValidation", "type": "REGEX", "description": "Date should be in YYYY-MM-DD", "version": "1", "data": "^\\d{4}\\-(0[1-9]|1[012])\\-(0[1-9]|[12][0-9]|3[01])$" } }, { "allowMarkdown": false, "description": "Farsight DNSDB Start Date", "errorMessage": "Invalid Date Format, Please Enter Farsight DNSDB Start Date in YYYY-MM-DD format", "maxLength": 10, "name": "Farsight DNSDB Start Date", "system": false, "version": 1, "indicators": [], "groups": [], "validationRule": { "name": "FarsightDateValidation", "type": "REGEX", "description": "Date should be in YYYY-MM-DD", "version": "1", "data": "^\\d{4}\\-(0[1-9]|1[012])\\-(0[1-9]|[12][0-9]|3[01])$" } } ] }Save this output as a JSON file.
Using a text editor, open the newly-saved JSON file and make the following modifications:
For each item within the
typeslist, add the appropriate values to theindicatorsand/orgroupslist for your attributes. These should be specified as the names that these items appear within the UI such asAddressas an indicator type orAdversaryas a group type. Specify each item within the list using double-quotes around the names and comma-separated to maintain proper JSON syntax. Here’s an example:Code Block "indicators": ["Host","Address"],
NOTE: You must specify at least one value in the
indicatorsorgroupslist. Leaving both blank is an invalid configuration.
Save all of your modifications and check the file for correct JSON syntax. Your file is now ready to be used for imports.
NOTE: Attributes are versioned and so please remember to increment the version when updating custom attributes through a JSON import. Otherwise, a previous version of the attribute might be used instead.
Test Import of Custom Attributes
...